

前言
GitHub 上面开源了多个 Android 数据库,比如 GreenDao , LitePal , ORMLite 等,开源的数据库一般都是使用非常简单,不用开发者写 SQL,创建 table 等一些繁琐的操作,都是基于对对象的一些操作。那么我们自己可以设计一款不用自己来写 SQL 的轻量级数据库吗?当然可以,下面我们就来开干。
使用
-
给一个 Object 对象定义协定好的注解 table ,id
@YKTable("tb_police") public class Police { /** * 人员 id */ @YKField("_id") private String id; /** * 人员姓名 */ private String name; public Police(String id, String name) { this.id = id; this.name = name; } public Police() { } public String getId() { return id; } public void setId(String id) { this.id = id; } public String getName() { return name; } public void setName(String name) { this.name = name; } @Override public String toString() { return "Police{" + "id='" + id + '\'' + ", name='" + name + '\'' + '}'; } } -
插入数据
BaseDaoFactory.getOurInstance().getBaseDao(Police.class).insert(new Police("01", "DevYK")); -
删除数据
BaseDaoFactory.getOurInstance().getBaseDao(Police.class).delete(new Police("01", "DevYK")); -
更新数据
BaseDaoFactory.getOurInstance().getBaseDao(Police.class).updata(new Police("02", "BaseDevYK"), new Police("01", "DevYK")); -
查询数据
BaseDaoImp<Police> mBaseDao BaseDaoFactory.getOurInstance().getBaseDao(Police.class);
Police police = new Police();
police.setId("02");
List<Police> policeLists = mBaseDao.query(police);
到这里,增删改查咱们都已经操作完了,使用是不是非常的简单,不用使用者写一行 SQL 语句,基本上一行代码解决,下面我们来看看源码实现,它到底做了些什么?
自动创建 table
流程
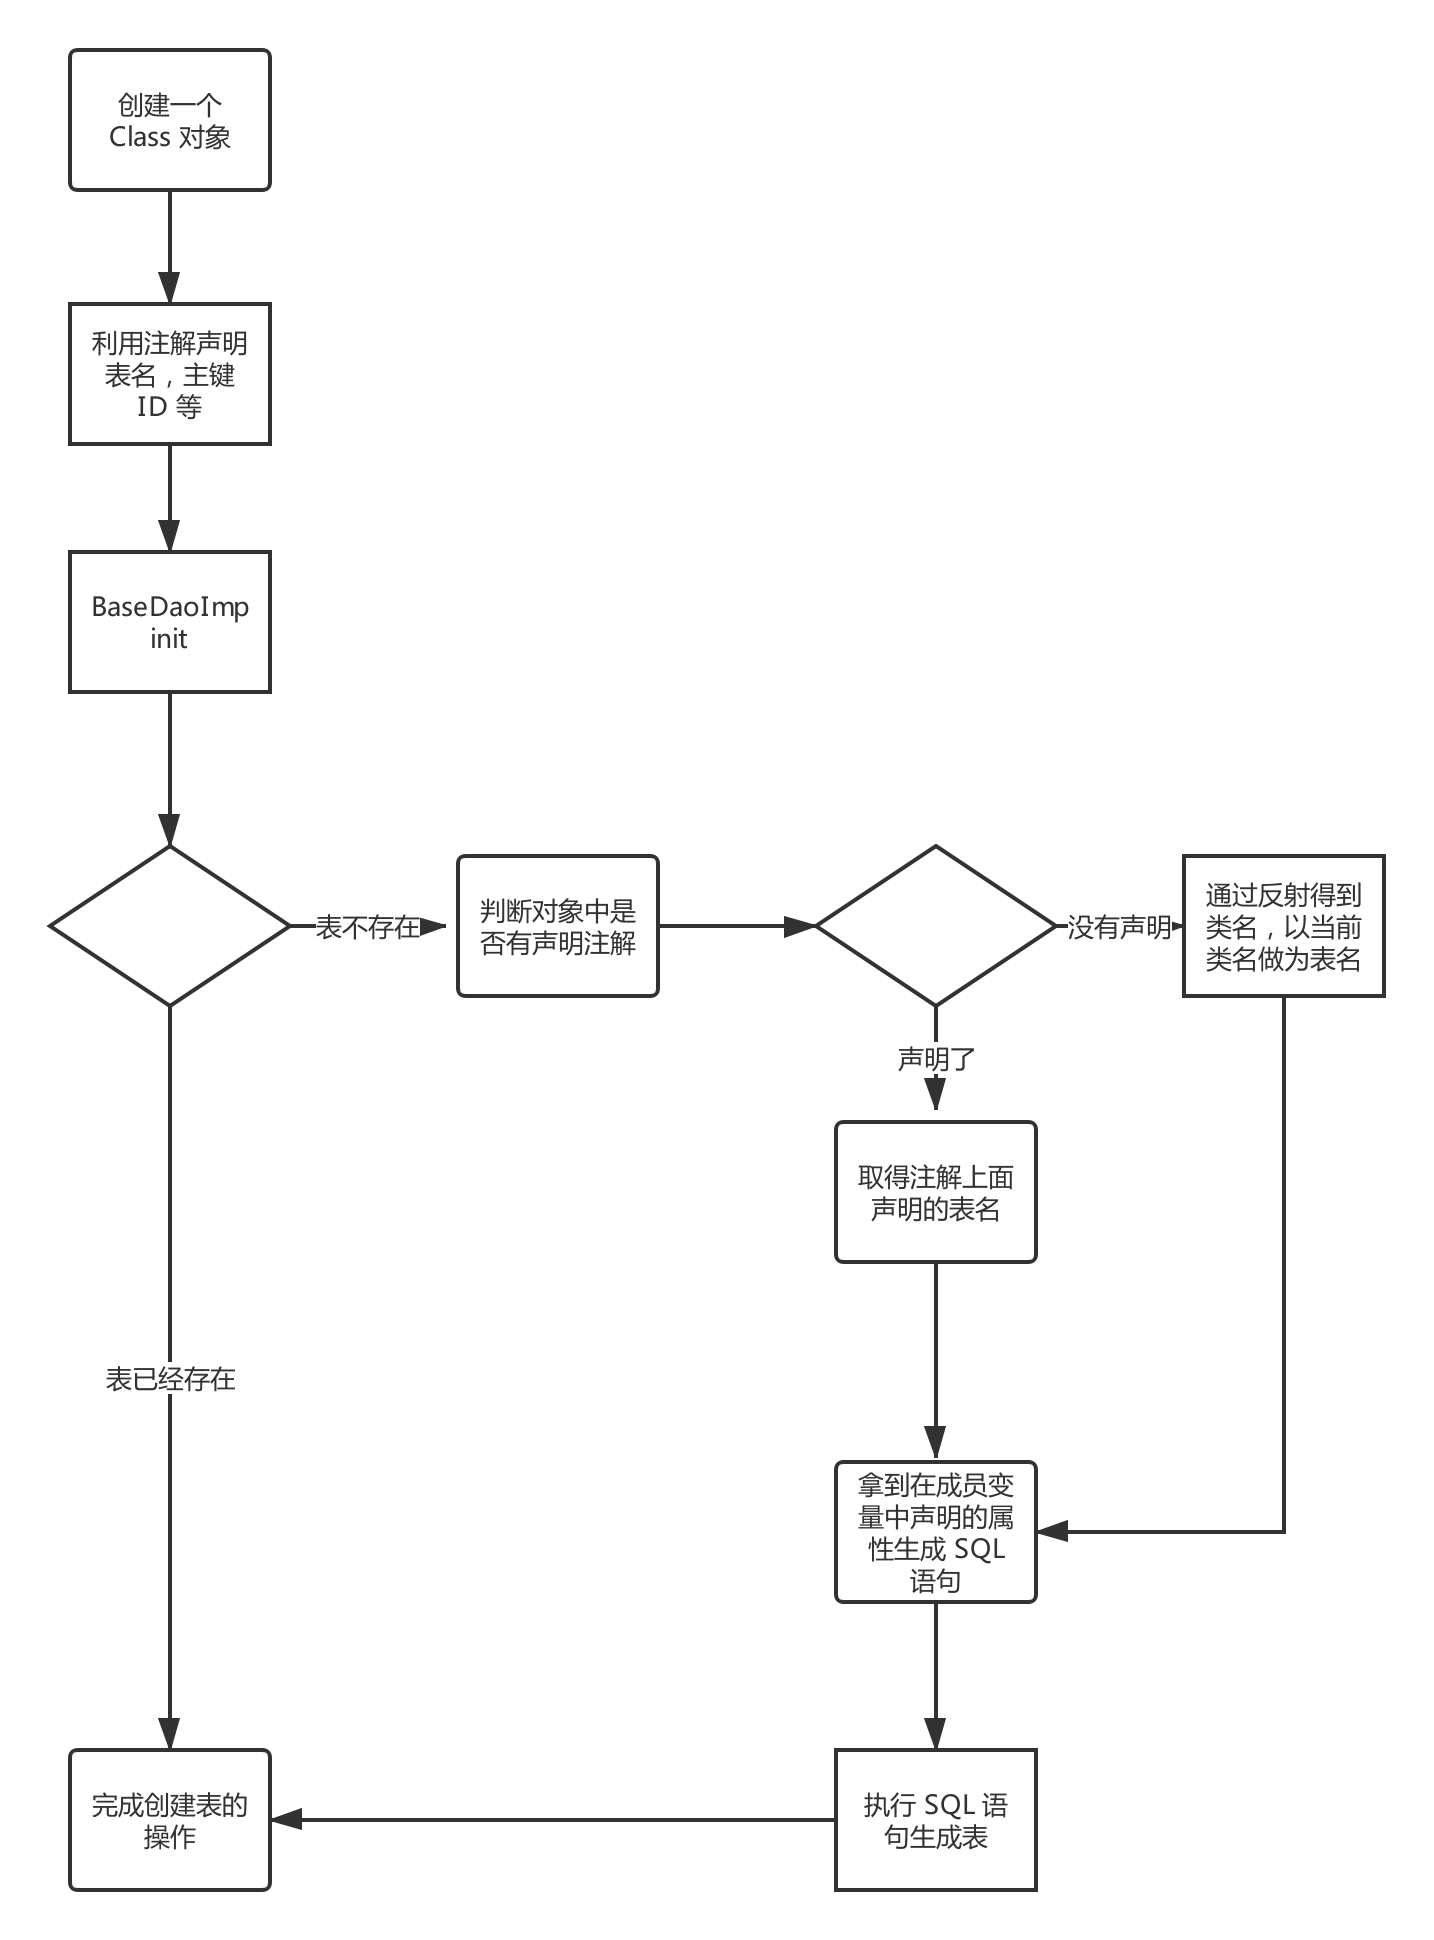
创建表核心代码
    /**
     * 初始化
     *
     * @param sqLiteDatabase
     * @param entityClass
     */
    public void init(SQLiteDatabase sqLiteDatabase, Class<T> entityClass) {
        this.mSQLiteDatabase = sqLiteDatabase;
        this.mEntityClass = entityClass;

        if (!isInit) {
            //自动建表,取得表名
            if (entityClass != null && (entityClass.getAnnotation(YKTable.class) == null)) {
                //通过反射得到类名
                this.mTableName = entityClass.getSimpleName();
            } else {
                if (TextUtils.isEmpty(entityClass.getAnnotation(YKTable.class).value())) {
                    //如果有注解但是注解为空的话,就取当前 类名
                    this.mTableName = entityClass.getSimpleName();
                } else {
                    //取得注解上面的表名
                    this.mTableName = entityClass.getAnnotation(YKTable.class).value();
                }

            }

            //执行创建表的操作, 使用 getCreateTabeSql () 生成 sql 语句
            String autoCreateTabSql = getCreateTableSql();
            Log.i(TAG, "tagSQL-->" + autoCreateTabSql);
            //执行创建表的 SQL
            this.mSQLiteDatabase.execSQL(autoCreateTabSql);
            mCacheMap = new HashMap<>();
            initCacheMap();
            isInit = true;

        }
    }
insert 插入数据
流程
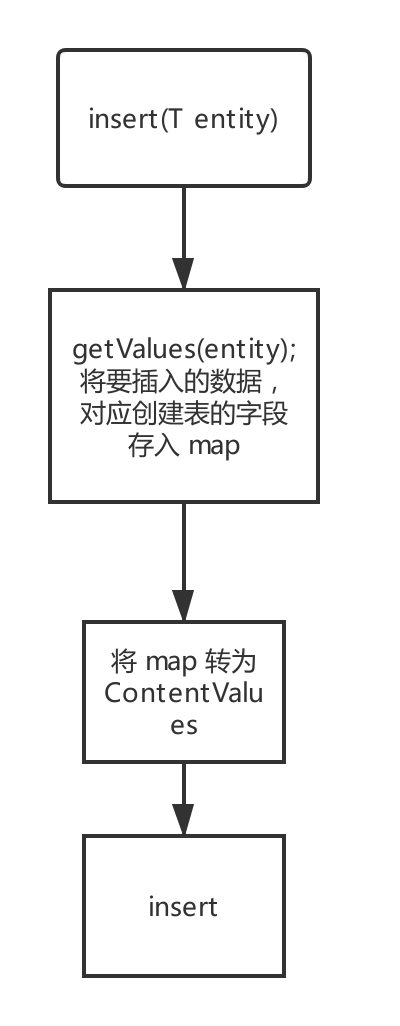
插入核心代码
    /**
     * 插入数据
     * @param entity
     * @return
     */
    @Override
    public long insert(T entity) {
        //1. 准备好 ContentValues 中需要的数据
        Map<String, String> map = getValues(entity);
        if (map == null || map.size() == 0) return 0;
        //2. 把数据转移到 ContentValues 中
        ContentValues values = getContentValues(map);
        //将数据插入表中
        return mSQLiteDatabase.insert(mTableName, null, values);
    }
- 首先接收外部传入的数据对象。
- 对数据对象进行解析,拿到数据库表中对应字段的值,拿到之后将字段 key,对应的值 values 存入 map。
- 将 map 解析为 ContentValues。
- 进行数据库插入 mSQLiteDatabase.insert。
delete 删除数据
流程图
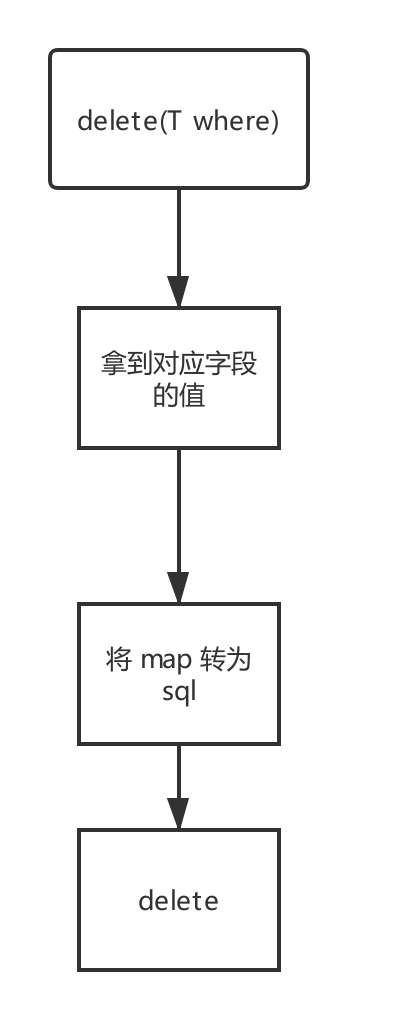
核心代码流程
-
拿到对应字段的值
/** * key(字段) - values(成员变量) ---》getValues 后 ---》key (成员变量的名字) ---values 成员变量的值 id 1,name alan , password 123 * * @param entity * @return */ private Map<String, String> getValues(T entity) { HashMap<String, String> map = new HashMap<>(); //返回所有的成员变量 Iterator<Field> iterator = mCacheMap.values().iterator(); while (iterator.hasNext()) { Field field = iterator.next(); field.setAccessible(true); try { Object object = field.get(entity); if (object == null) { continue; } String values = object.toString(); String key = ""; if (field.getAnnotation(YKField.class) != null) { key = field.getAnnotation(YKField.class).value(); } else { key = field.getName(); } if (!TextUtils.isEmpty(key) && !TextUtils.isEmpty(values)) { map.put(key, values); } } catch (IllegalAccessException e) { e.printStackTrace(); } } return map; } -
将拿到要删除的 key,values 字段对应的值,自动生成 SQL
public Condition(Map<String,String> whereCasue) { //whereArgs 里面的内容存入的 list ArrayList list = new ArrayList(); StringBuffer stringBuffer = new StringBuffer(); stringBuffer.append("1=1"); //取得所有成员变量的名字 Set<String> keys = whereCasue.keySet(); Iterator<String> iterator = keys.iterator(); while (iterator.hasNext()) { String key = iterator.next(); String value = whereCasue.get(key); if (value != null){ stringBuffer.append(" and " + key + "=?"); list.add(value); } } this.whereClause = stringBuffer.toString(); this.whereArgs = (String[]) list.toArray(new String[list.size()]); } -
根据生成的 SQL 条件删除数据
int delete = mSQLiteDatabase.delete(mTableName, condition.getWhereClause(), condition.getWhereArgs());
query 查询数据
流程图
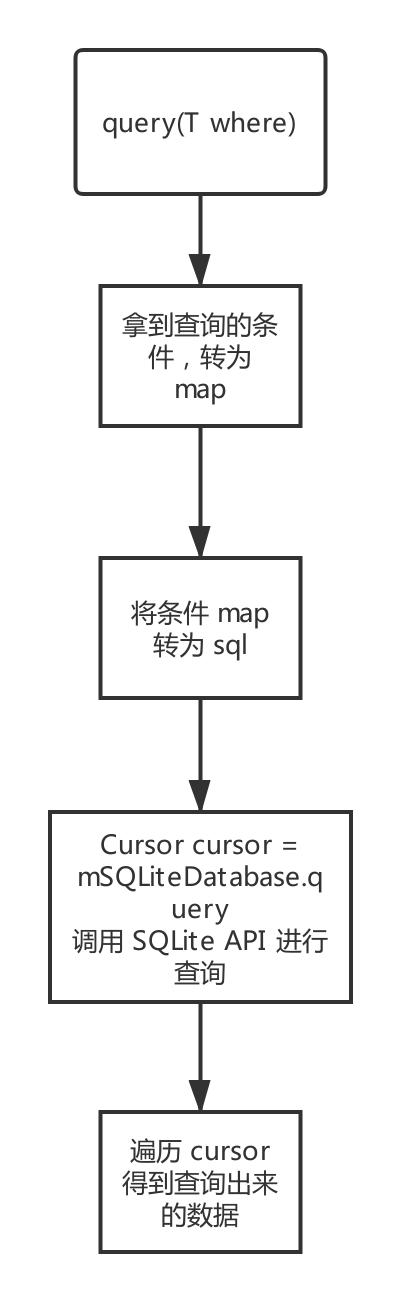
核心代码流程
-
拿到查询的条件的对象,转为 key,values 的 map 对象
Map<String, String> values = getValues(where); private Map<String, String> getValues(T entity) { HashMap<String, String> map = new HashMap<>(); //返回所有的成员变量 Iterator<Field> iterator = mCacheMap.values().iterator(); while (iterator.hasNext()) { //拿到成员变量 Field field = iterator.next(); //设置可操作的权限 field.setAccessible(true); try { //拿到成员变量对应的值 values Object object = field.get(entity); if (object == null) { continue; } String values = object.toString(); String key = ""; //如果成员变量上声明了注解,直接拿到该值 key,反之反射拿 if (field.getAnnotation(YKField.class) != null) { key = field.getAnnotation(YKField.class).value(); } else { key = field.getName(); } //将类中拿到的 key values 存入 map 中 if (!TextUtils.isEmpty(key) && !TextUtils.isEmpty(values)) { map.put(key, values); } } catch (IllegalAccessException e) { e.printStackTrace(); } } return map; } -
将 map 转为自动生成 SQL 对象
public Condition(Map<String,String> whereCasue) { //whereArgs 里面的内容存入的 list ArrayList list = new ArrayList(); StringBuffer stringBuffer = new StringBuffer(); stringBuffer.append("1=1"); //取得所有成员变量的名字 Set<String> keys = whereCasue.keySet(); Iterator<String> iterator = keys.iterator(); while (iterator.hasNext()) { String key = iterator.next(); String value = whereCasue.get(key); if (value != null){ //查询的条件 sql stringBuffer.append(" and " + key + "=?"); //查询的条件对应的 值 list.add(value); } } this.whereClause = stringBuffer.toString(); this.whereArgs = (String[]) list.toArray(new String[list.size()]); } -
查询数据,并遍历 Cursor 取出数据
Cursor cursor = mSQLiteDatabase.query(mTableName,null,condition.getWhereClause(), condition.getWhereArgs(), null, limitString,  orderBy);

List<T> result = getResult(cursor, where);
update 更新数据
流程图
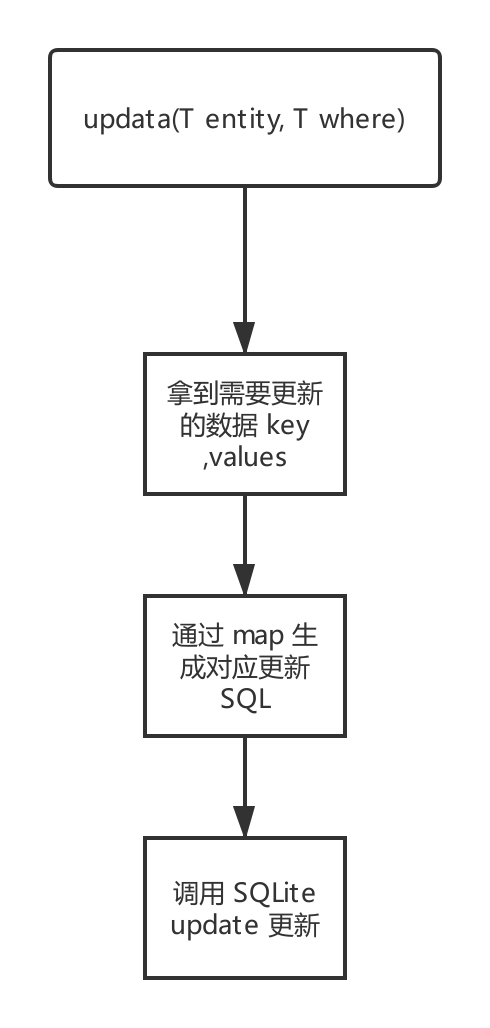
核心代码流程
-
拿到需要更新的值,转为 map
Map<String, String> values = getValues(entity); -
将需要更新的 map 转为 ContentValues
ContentValues contentValues = getContentValues(values); -
将条件转为 map
//条件 Map<String, String> whereMp = getValues(where); -
将条件 map 转为 sql
    public Condition(Map<String,String> whereCasue) {
        //whereArgs 里面的内容存入的 list
        ArrayList list = new ArrayList();
        StringBuffer stringBuffer = new StringBuffer();
        stringBuffer.append("1=1");

        //取得所有成员变量的名字
        Set<String> keys = whereCasue.keySet();
        Iterator<String> iterator = keys.iterator();
        while (iterator.hasNext()) {
            String key = iterator.next();
            String value = whereCasue.get(key);
            if (value != null){
              	//查询的条件 sql
                stringBuffer.append(" and " + key + "=?");
              	//查询的条件对应的 值
                list.add(value);
            }
        }

        this.whereClause = stringBuffer.toString();
        this.whereArgs = (String[]) list.toArray(new String[list.size()]);
    }
总结
通过上面的步骤,我们不编写 SQL ,完全是依赖数据对象来做操作,对 SQL 不太熟悉的很友好。对于那些开源框架为什么可以自动建表,不用填写 SQL ,仅仅通过数据 Bean 就能操作数据库的好奇,在没有了解它们内部实现的原理下,看看自己能不能实现,结果也没那么难嘛。但是实际项目还是建议在了解内部实现原理的情况下使用开源框架。在这里推荐下 郭霖大神的 LitePal 框架非常稳定,使用非常简单,易上手。
如果对上面源码感兴趣的可以去我的代码仓库YKDB详细了解。
