关于 TCP"拆/黏包"的想法
之前在做 tcp 内网穿透小工具的时候遇到了所谓的 TCP"拆包黏包"的情况。其表现形式可以用一下代码来展示
// server
socket.on('data', (e) => console.log(e.toString()))

// client
for (let i = 0; i < 100; i += 1) {
  connect.send('666')
}
Server 端会打出几次 666?反正肯定不会是 100 次, 因为会发生 TCP 的"拆/黏包"现象。
其实 TCP 并不存在"包"的概念。我们俗称的"拆/黏包"只是很形象的描述了"多次 send 的数据被一次全部 recv 了出来"的情况。实际上 TCP 是流式协议, 数据是以数据流的形式存在的。有一个很简单的类比就是大家都知道文件流, 那么在读文件的时候肯定不会说我的文件数据被"拆/黏包"了吧。
那么这种奇怪的情况我们应该怎么解决呢?事实上, TCP 会帮我们把数据变为字节流依次发出, 我们应该考虑如何才能依次解析数据流。TCP 只是数据搬运工, 具体怎么装箱拆箱还是需要由我们来做。
至此, "拆/黏包"问题就变成了一个"TCP 数据解析协议"的问题了。
目前我接触到的的解决办法有 3 种, 分别是:
- 为每次发送的数据添加分隔符
- 每次发送定长的数据
- 在每次发送的数据之前添加 4 位标识, 用来表示该数据的长度
我尝试着实现了一下第 3 种解决方案。
实现
我们希望服务端每次收到数据之后, 都将数据转发给解析器。解析器进行数据处理之后, 如果发现完整的数据包则由解析器将其抛出。API demo 如下
const messageCenter = new MessageCenter();
socket.on('data', e => messageCenter.push(e));
messageCenter.data(packet => console.log(packet))
1. 基础类
首先实现一个基本的类, 大致上是一个简单的事件监听模型。
class MessageCenter {
  constructor() {
    this.dataListeners = [];
  }
  data(listener) {
    this.dataListeners.push(listener);
  }
  emit(data) {
    this.dataListeners.forEach(listener => listener(data));
  }

  push(data) {  }
}
2. push 数据
1. 改造 constructor
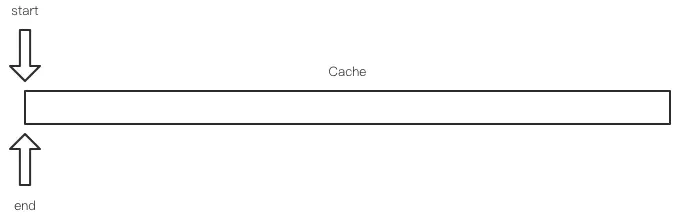
首先改造 constructor 方法, 让我们有一个非常厉害的地方能暂时存储数据。并且用一个值来指向当前已存储的数据的末尾, 用一个值来指向当前已存储的数据的开头。
constructor() {
  this.dataListeners = [];
  this.cacheSize = 1024;
  this.cache = Buffer.alloc(this.cacheSize);
  this.start = 0;
  this.end = 0;
}
目前的数据结构看起来是这样的
2. 实现 push 数据方法
可以直接实现第一版 push 函数
emit(data) {  }

push(data) {
  const dataLength = data.length;
  this.cache.fill(data, this.end, this.end + dataLength);
  this.end += dataLength;
  this.decode(); // 尝试开始解析包
}
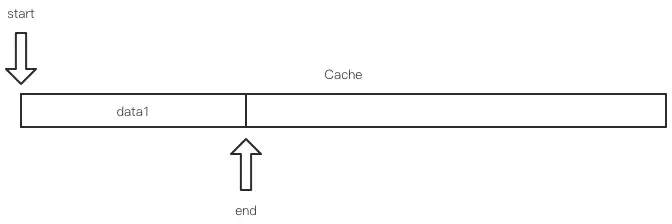
当有数据被 push 时, 数据结构会变成
3. 分析数据
在分析之前, 我们先建立一个小函数用于获取当前已存储的数据长度
constructor() {  }

get currentDataSize() {
  return this.end - this.start;
}

data(listener) {  }
之后我们可以创建第一版解析数据函数。我们可以先假定数据的前 4 位代表数据长度。并且前 4 位的长度也被包含在数据包长度中。
push(data) {  }

decode() {
  if (this.currentDataSize < 4) { return; }
  const dataSize = this.cache.readInt32BE(this.start);

  if (dataSize < this.currentDataSuze) { return; } // 当前数据长度比目标数据长度小

  const data = Buffer.alloc(dataSize);
  this.cache.copy(pack, 0, this.start, this.start + dataSize); // 拿到当前数据包
  this.start += dataSize;
  this.emit(data);
  this.decode(); // 解析完一个包之后, 立刻尝试解析下一个包
}
假设此时 data 为一个完整的数据
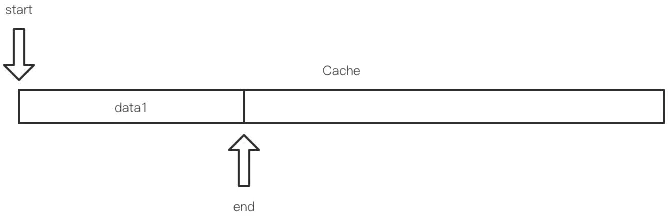
那么在解析完成之后, 数据结构会变成
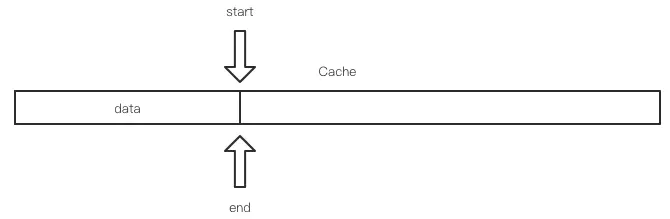
此时 data 还存储在 cache 中, 只是 start 和 end 的指向发生了改变。
4. 完善 push 函数
在 push 数据的时候可能会出现 cache 不够大的情况, 这里分为两种情况处理。
- 数据无法直接插入尾部, 但是可以将部分数据插入尾部, 另一部分数据从 cache 首部(0)开始继续往后排
- 数据无论如何都无法放入, 当前 cache 的空间太小, 需要扩容
1. 第一种情况
数据结构图如下:
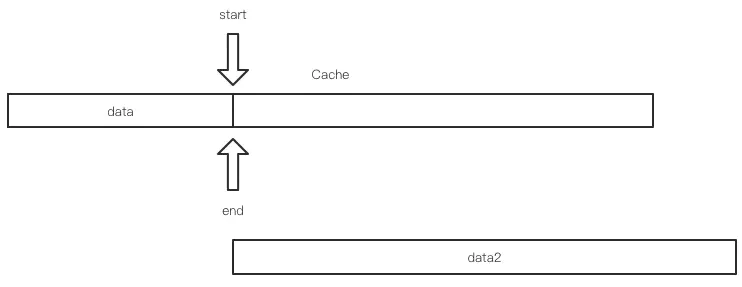
我们可以将 data2 的一部分放在 cache 的尾部, 另一部分从 cache 的 0 开始往后放。
放置之后的数据结构图:
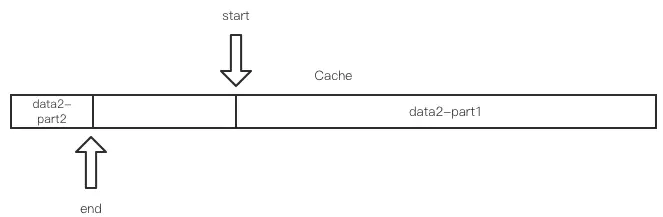
我们可以看出此时 end 的和 start 的位置关系也变了。此时的 end 应该等于 data2.length - (this.cacheSize - this.end)
首先我们需要先改造一下 currentDataSize 函数
constructor() {  }

get currentDataSize() {
  return this.end >= this.start
    ? this.end - this.start
    : this.cacheSize - (this.start - this.end);
}

data(listener) {  }
之后再来改造 push 函数第二版
emit() {  }

push(data) {
  const dataLength = data.length;
  if (dataLength <= this.cacheSize - this.currentDataSize) { // 总剩余空间还足够
    if (this.end + dataLength > this.cacheSize) { // 不能直接放在尾部
      const nextEnd = dataLength - (this.cacheSize - this.end);
      this.cache.fill(b, this.end, this.cacheSize);
      this.cache.fill(b.slice(this.cacheSize - this.end), 0, nextEnd);
      this.end = nextEnd;
    } else { // 可以直接放在尾部
      this.cache.fill(data, this.end, this.end + dataLength);
      this.end += dataLength;
    }
    this.decode(); // 直接开始解析
  } else { // 总剩余空间不够, 需要扩容

  }
}

decode() {  }
2. 第二种情况
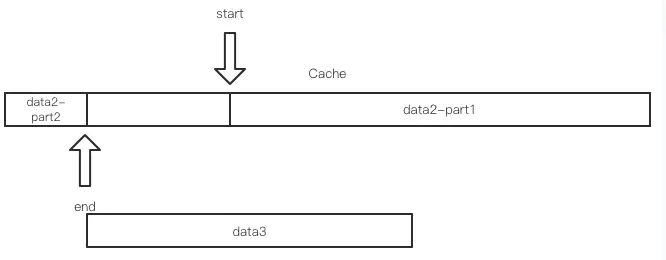
当总剩余空间不够, 需要扩容时, 也对应两种情况:
- this.end >= this.start - 可以直接将当前数据迁移到扩容之后的 cache 中
- this.end < this.start - 不可以直接迁移, 需要分段迁移
其中 2 对应的情况是这样
我们继续完善第三版 push 函数
push(data) {
  const dataLength = data.length;
  if (this.cacheSize - this.currentDataSize) { // 总剩余空间还足够 ...

  } else { // 总剩余空间不够, 需要扩容
    const nextCacheSize = 2 * this.cacheSize;
    const nextCache = Buffer.alloc(nextCacheSize);
    const nextStart = 0;
    const nextEnd = this.currentDataSize;

    if (this.end >= this.start) { // 第一种情况, 直接迁移数据
      this.cache.copy(nextCache, 0, this.start, this.end);
    } else { // 第二种情况, 分段迁移数据
      this.cache.copy(nextCache, 0, this.start, this.cacheSize);
      this.cache.copy(nextCache, this.cacheSize - this.start, 0, this.end);
    }

    this.cache = nextCache;
    this.cacheSize = nextCacheSize;
    this.start = nextStart;
    this.end = nextEnd;
    this.push(b); // 扩容之后直接重新调用push函数
  }
}
5. 完善 decode 函数
在正式 decode 之前获取数据长度时, 也有两种情况需要分类,
- 代表包长度的 4 个字节正好被分段
- 代表包长度的 4 个字节没有被分段
第 1 种情况的数据结构图如下, 红色表示包的头 4 个字节:

在第 1 种情况下获取包长度也需要分段获取:
push(data) {  }

decode() {
  if (this.currentDataSize < 4) { return; }

  let dataSize = 0;
  if (this.currentDataSize - this.start < 4) { // 头4字节被分段
    const headBuffer = Buffer.concat([
      this.cache.subarray(this.start),
      this.cache.subarray(0, 4),
    ]);
    dataSize = headBuffer.readInt32BE(0);
  } else {
    dataSize = this.cache.readInt32BE(this.start);
  }

  if (this.currentDataSize < dataSize) { return; }
}
在获取到包长度后, 也需要分类处理当前的包是否在中间被分段的情况:
push(data) {  }

decode() {
  // ...
  if (this.currentDataSize < dataSize) { return; }

  const data = Buffer.alloc(dataSize);

  if (this.start + dataSize > this.cacheSize) { // 包被分段
    const nextStart = dataSize - (this.cacheSize - this.start);
    this.cache.copy(data, 0, this.start, this.cacheSize);
    this.cache.copy(data, this.cacheSize - this.start, 0, nextStart);
    this.start = nextStart;
  } else { // 包没有被分段
    this.cache.copy(data, 0, this.start, this.start + dataSize);
    this.start += dataSize;
  }

  this.emit(data);
  this.decode(); // 解析完一个包之后, 立刻尝试解析下一个包
  }
}
测试
Server.js
const net = require('net');
const MessageCenter = require('./MessageCenter');

const msgCenter = new MessageCenter();

net.createServer((socket) => {
  socket.on('data', (d) => msgCenter.push(d));
}).listen(8888);

msgCenter.data((pack) => {
  console.log(pack);
});
Client.js
const net = require('net')
const BB = require('./bb')

const conn = net.connect({
  host: '127.0.0.1',
  port: 8888,
}, () => {
  for (let i = 0; i < 30000; i++) {
    conn.write(BB.pack(Buffer.from('66666666666666666666666666' + i, 'utf-8')).toBuffer());
  }
});
我用了一个简单的工具类 bb.js, 源码如下:
class BB {
  constructor(b) {
    this.length = b.length;
    this.content = b;
  }

  toBuffer() {
    const head = Buffer.alloc(4);
    head.writeInt32BE(this.length + 4, 0);
    const buffer = Buffer.concat([head, this.content]);

    return buffer;
  }

  static pack(b) {
    return new BB(b);
  }
}

module.exports = BB;
依次运行 Server.js, Client.js 可以发现, 数据被正确的解析了。
以上所有代码都可以在 https://github.com/zjhch123/tcp-demo 找到。
欢迎来到这里!
我们正在构建一个小众社区,大家在这里相互信任,以平等 • 自由 • 奔放的价值观进行分享交流。最终,希望大家能够找到与自己志同道合的伙伴,共同成长。
注册 关于