
Nginx 安装、配置
安装
CentOS 6/7 安装 Nginx
添加镜像源
sudo rpm -Uvh http://nginx.org/packages/centos/7/noarch/RPMS/nginx-release-centos-7-0.el7.ngx.noarch.rpm
通过 yum search nginx 看看是否已经添加源成功。如果成功则执行下列命令安装 Nginx
sudo yum install -y nginx
Ubuntu 16/18 安装 Nginx
sudo apt-get install nginx
浏览器输入 http://IP 如果出现 Welcome to nginx ! 字样表示安装成功。
默认安装位置:/usr/local/nginx
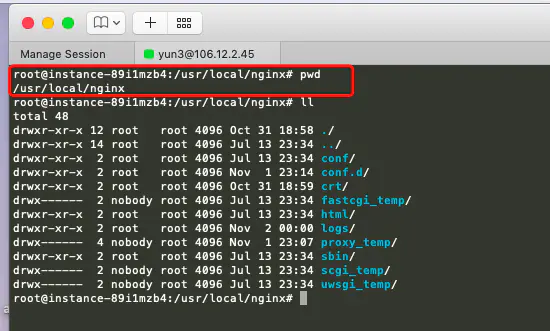
Nginx 目录下文件夹含义:
conf:nginx 所有配置文件
conf.d:默认的主配置文件
sbin : 存放主程序
html : 默认的静态页面
logs : 日志
scgi_temp : 临时目录
uwsgi_temp : 临时目录
Nginx 重启、停止、启动
#重启
service nginx restart

#停止
/usr/local/nginx/sbin/nginx -s stop
service nginx stop

#启动
/usr/local/nginx/sbin/nginx
service nginx start

#重新加载配置文件
/usr/local/nginx/sbin/nginx -c /usr/local/nginx/conf/nginx.conf
Nginx 配置 Http
编辑 conf/nginx.con http 下添加 include /usr/local/nginx/conf.d/*.conf;
vim /usr/local/nginx/conf/nginx.conf
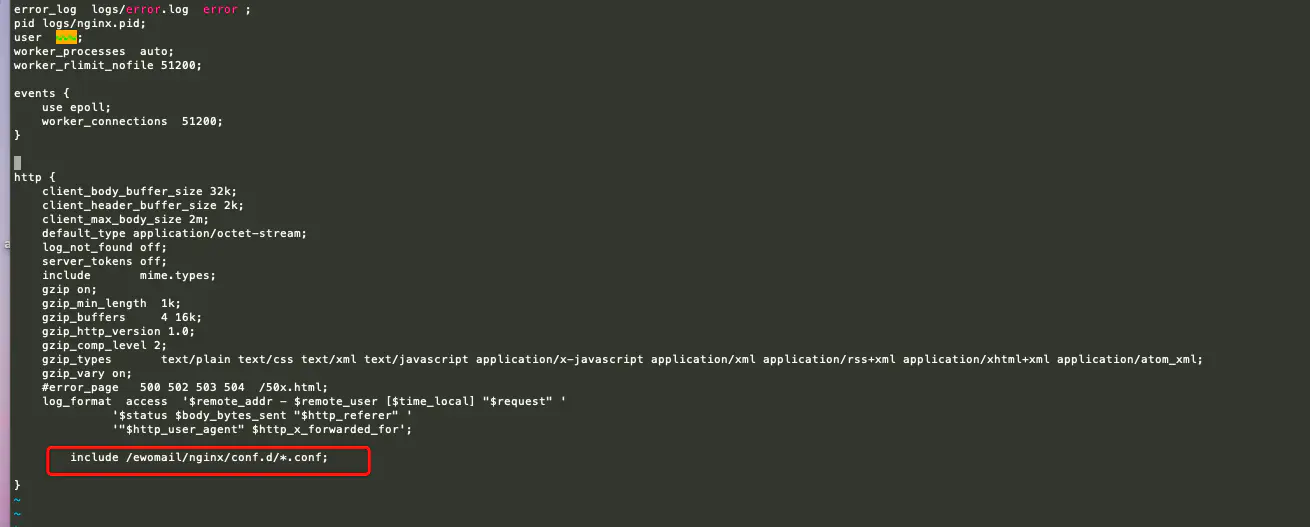
接着到 conf.d 下,新建任意以 .conf 结尾的文件
cd /usr/local/nginx/conf.d/
touch tomcat.conf
vim tomcat.conf
如果 cd 到 cond.d 目录下提示 -bash: cd: /usr/local/nginx/conf.d/: No such file or directory,需要创建 conf.d 文件夹,再进到 cond.d 下。
mdkir -p /usr/local/nginx/conf.d/
接下来配置 http 协议 80 端口
eg:博客地址:http://127.0.0.1:8080/blogs/
使用 Nginx 反向代理 8080 端口 blogs 项目
upstream blogs{
 ip_hash;  #session共享
 server 127.0.0.1:8080 max_fails=3 fail_timeout=600s;
}
server {
 listen 80 backlog=65535;
 server_tokens off;
 server_name  127.0.0.1;
 #access_log /gs/nginx-logs/teach.access.log;
 #proxy_set_header Host $host:$server_port;
 proxy_set_header Host $host;
 # 获取真实IP
 proxy_set_header X-Real-IP $remote_addr;
 proxy_set_header REMOTE-HOST $remote_addr;
 # 获取代理者的真实ip
 proxy_set_header X-Forwarded-For   $proxy_add_x_forwarded_for;
 proxy_http_version 1.1;
 #proxy_set_header Connection "";
 proxy_buffering off;
 proxy_redirect off;
 location / {
 #这两个方法都可,转发地址栏显示http://127.0.0.1,重定向显示http://127.0.0.1/blogs
#        rewrite "/" http://127.0.0.1/blogs; #重定向
 proxy_pass http://mblogs; #转发
 }
 location /blogs {
 proxy_next_upstream http_502 http_504 error timeout invalid_header;
 set $origin '*';#写入需要跨域的请求地址
 if ($request_method = 'OPTIONS') {
 add_header 'Access-Control-Allow-Origin' $origin;
 add_header 'Access-Control-Allow-Methods' 'GET, POST, OPTIONS';
 add_header 'Access-Control-Max-Age' 17280000;
 #add_header 'Content-Type' 'multipart/form-data';
 #add_header 'Content-Type' 'text/plain charset=UTF-8';
 add_header 'Content-Length' 0;
 return 204;
 }
 if ($request_method = 'POST') {
 add_header 'Access-Control-Allow-Origin' $origin;
 #add_header 'Content-Type' 'multipart/form-data';
 add_header 'Access-Control-Allow-Methods' 'GET, POST, OPTIONS';
 add_header 'Access-Control-Allow-Headers' 'DNT,X-CustomHeader,Keep-Alive,User-Agent,X-Requested-With,If-Modified-Since,Cache-Control,Content-Type';
 }
 if ($request_method = 'GET') {
 add_header 'Access-Control-Allow-Origin' $origin;
 add_header 'Access-Control-Allow-Methods' 'GET, POST, OPTIONS';
 add_header 'Access-Control-Allow-Headers' 'DNT,X-CustomHeader,Keep-Alive,User-Agent,X-Requested-With,If-Modified-Since,Cache-Control,Content-Type';
 }
 proxy_pass http://blogs;
 }
 }
Http 协议访问
至此,http 协议的反向代理就配置完成,下面是配置 https 协议。
申请 ssl 证书(阿里云为例)
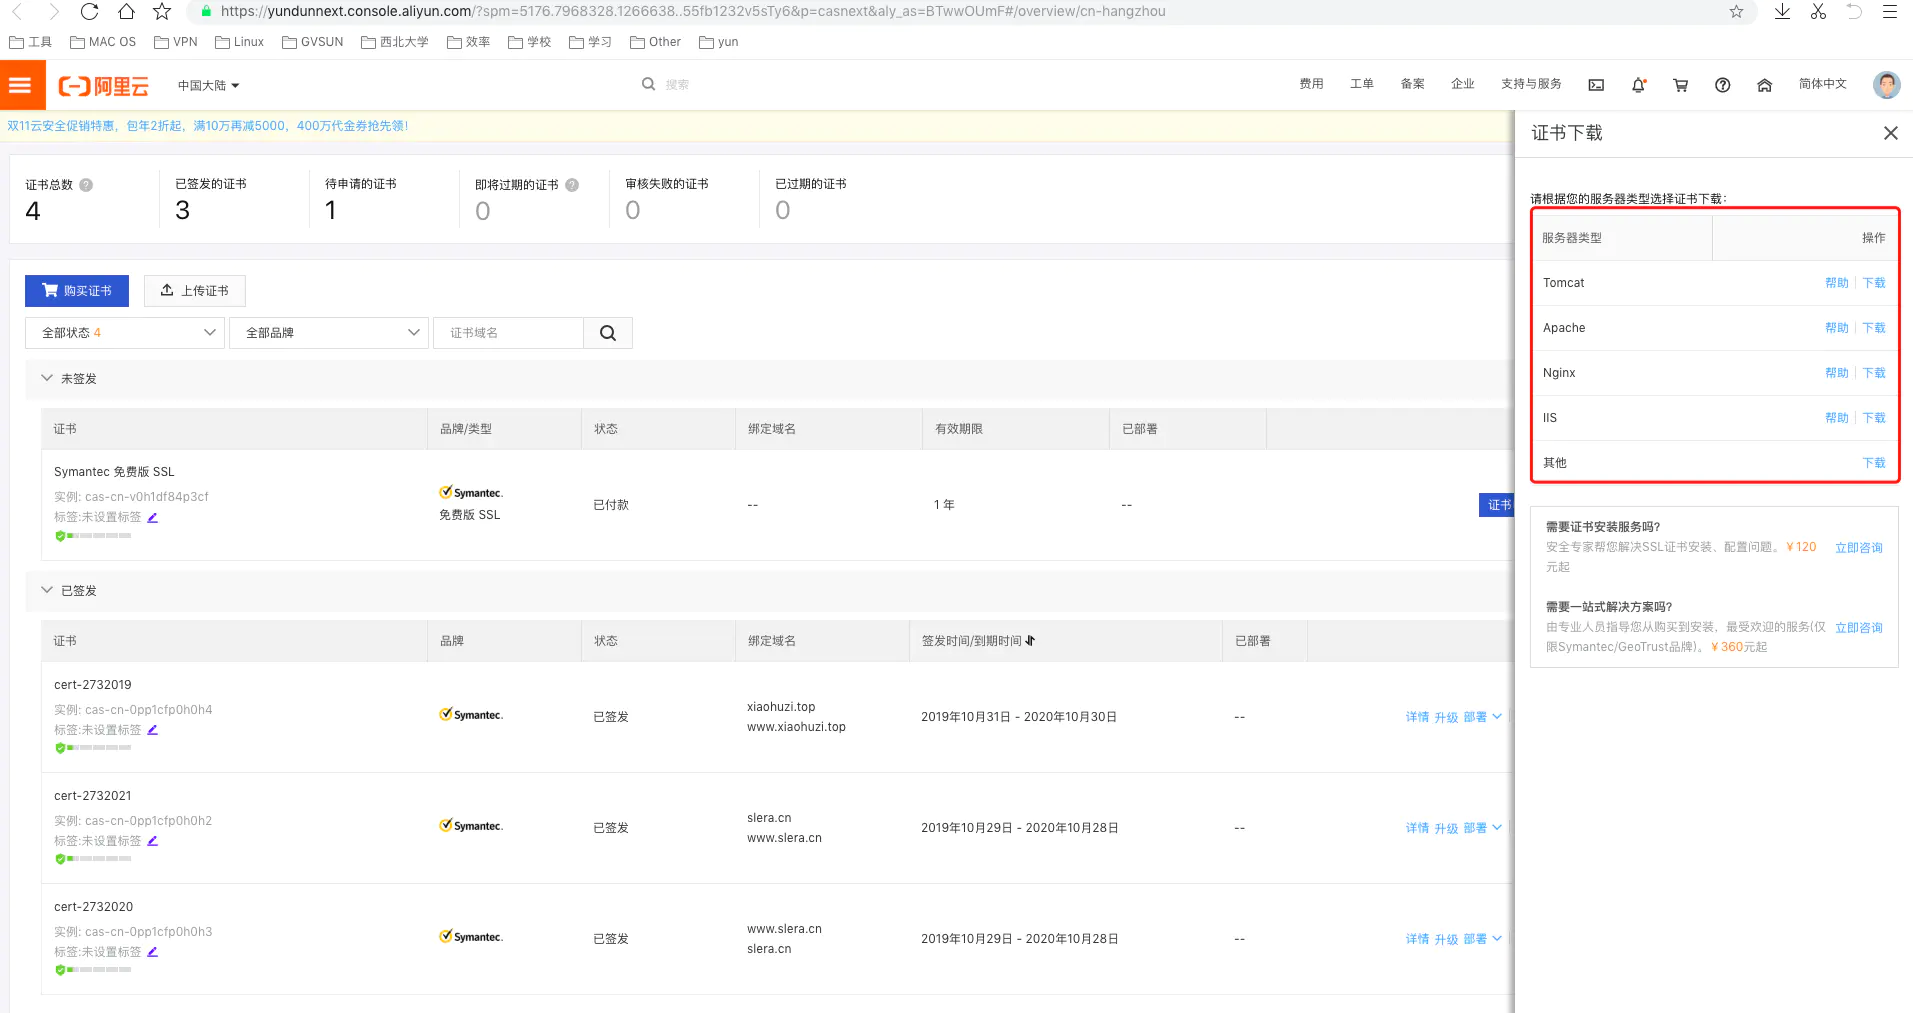
购买后在阿里云 SSL 证书管理控制台可以看到一个证书,未签发状态需要点击证书申请,填写绑定的域名和个人信息后,点击下一步等待申请,差不多不到一天就可以通过。
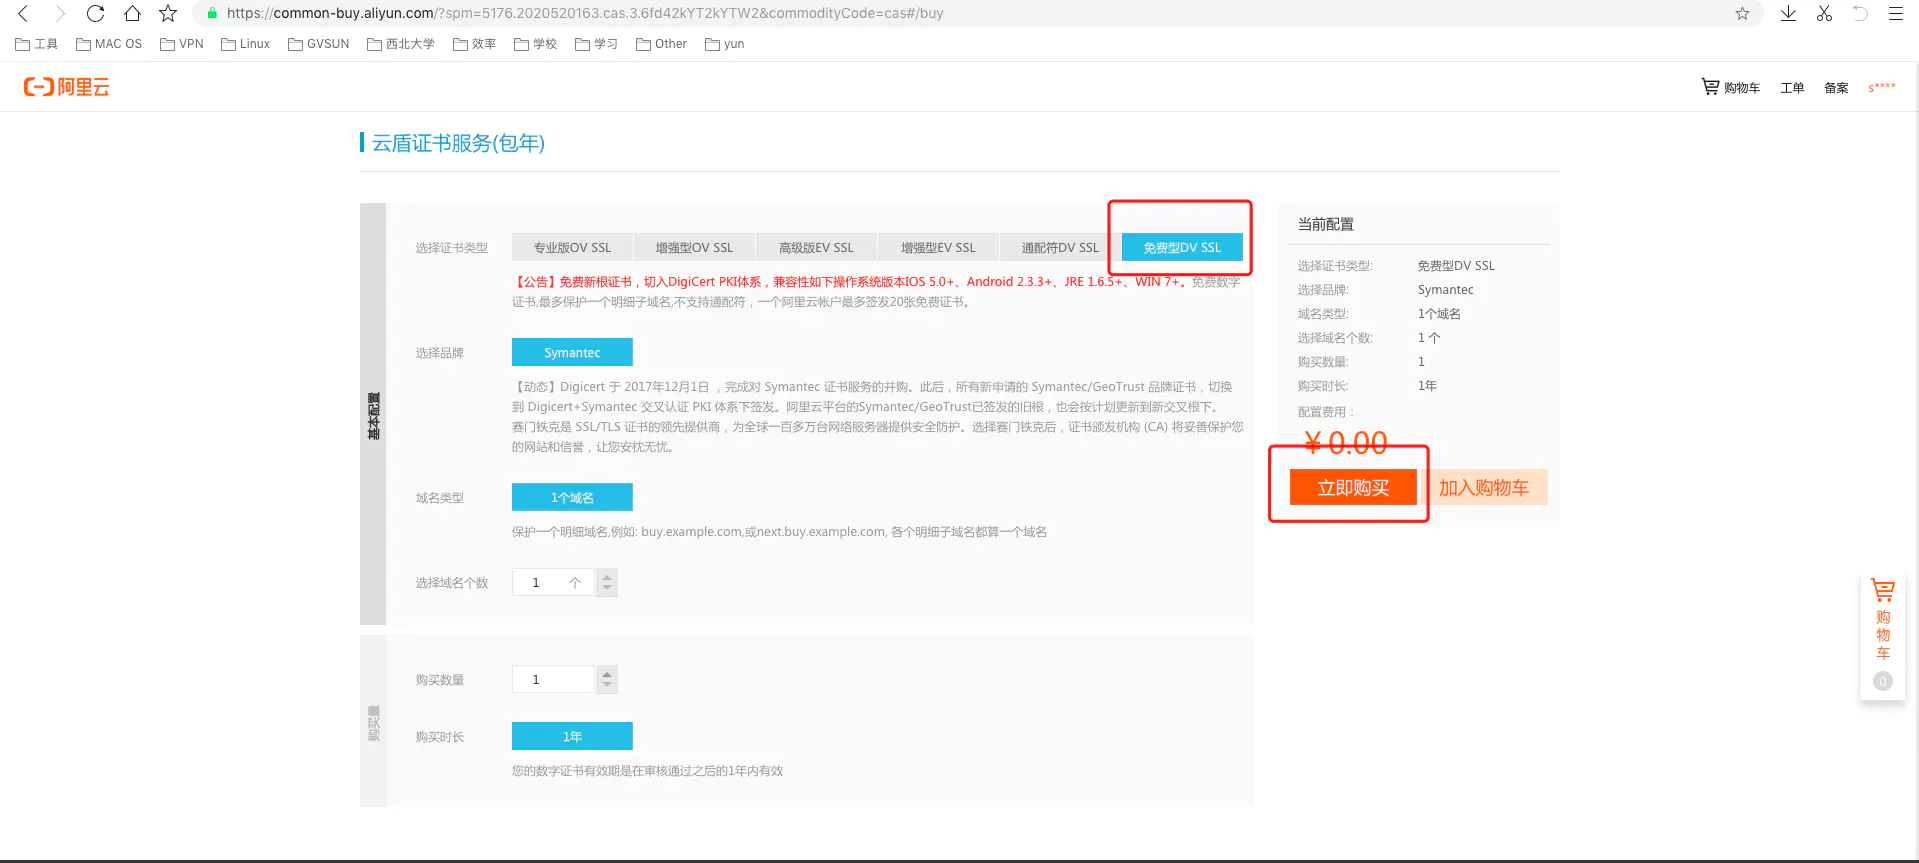

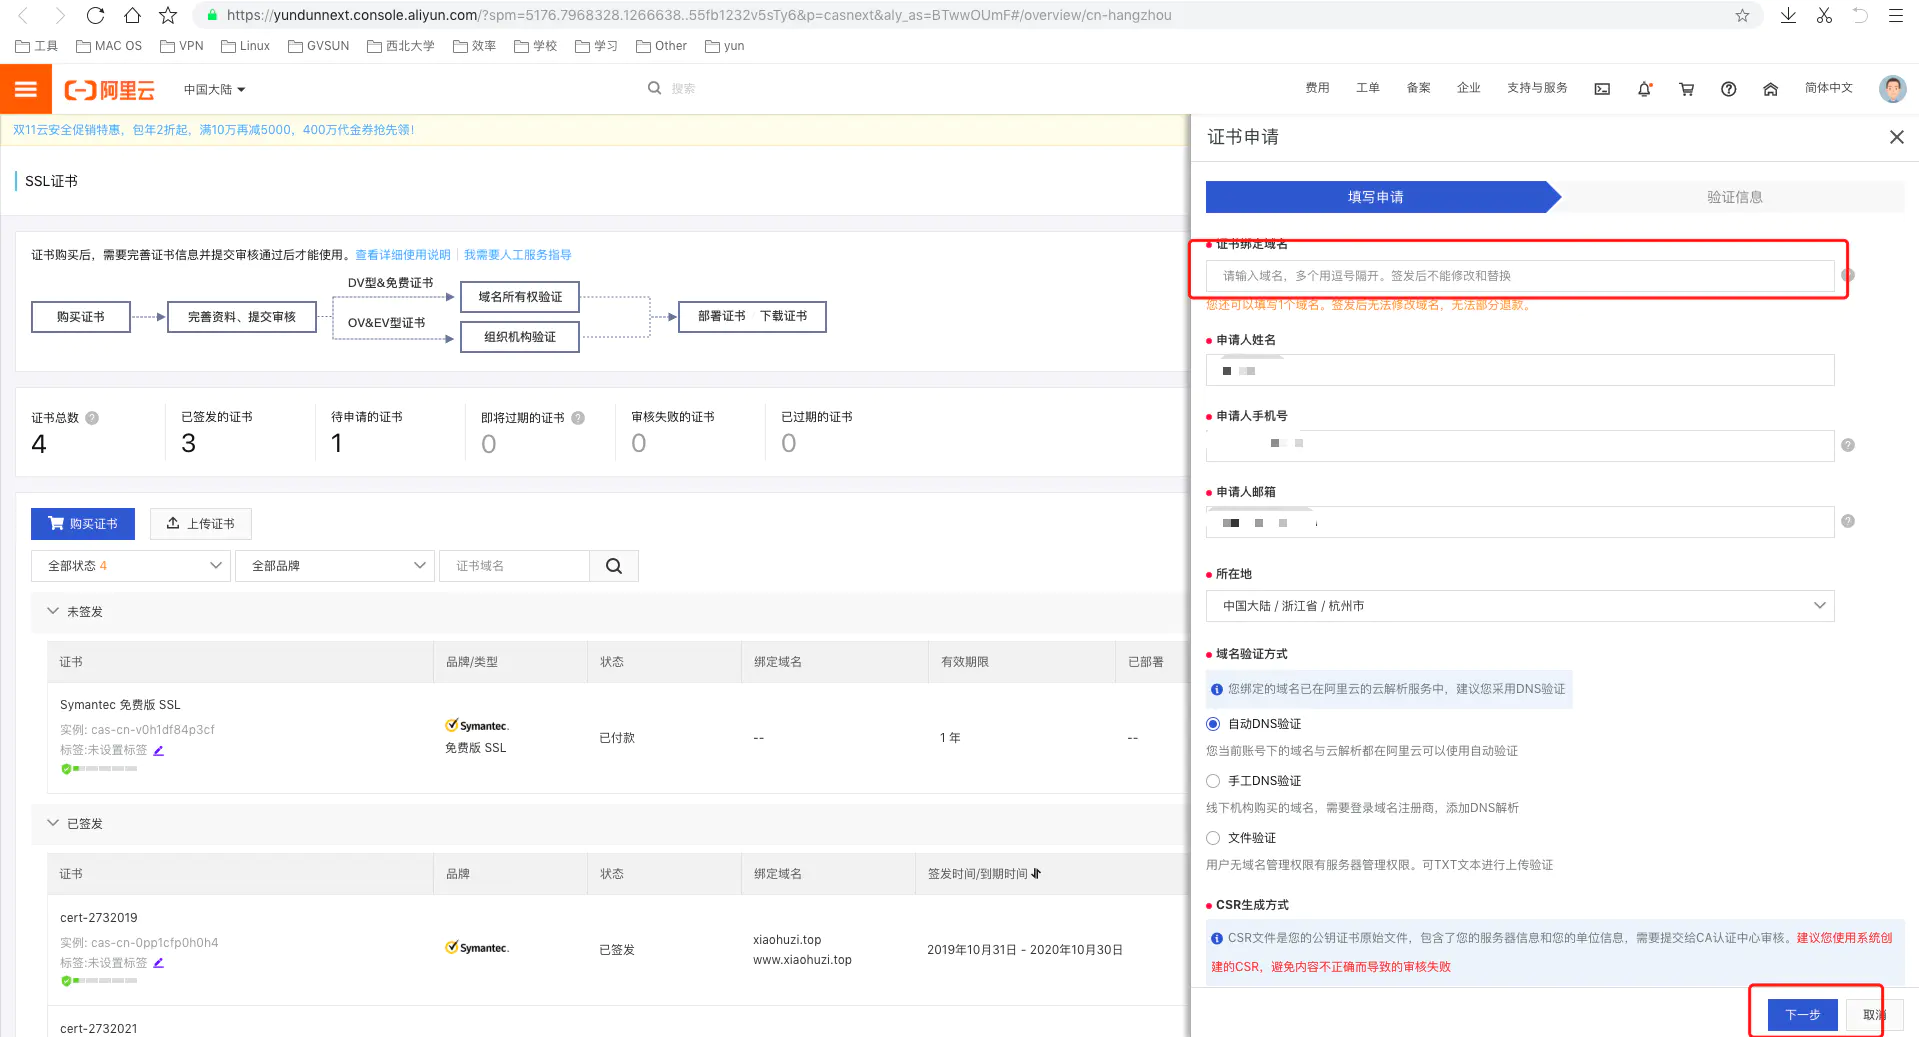
证书申请通过后,显示如下图;点击下载会弹出几大 Web 应用服务器的证书类型;点击下载即可,详情

配置 SSL
准备工作
将下载的 SSL 证书上传到服务器上面到 nginx 的根目录 /usr/local/nginx/ 下
cd /usr/local/nginx/
#创建crt文件夹
mkdir crt
#剪切到crt目录下
mv 3006543_sll.cn_tomcat.zip crt/

# 安装unzip  gzip  如果已安装,跳过这一步
yum install unzip  gzip   #Centos安装
apt-get yum install unzip  gzip   #Ubuntu 安装

#解压
unzip 3006543_sll.cn_tomcat.zip
解压完成后可以看到 .pem 和 .key 结尾的文件
.pem 是 SSL 的证书
.key 是 SSL 的秘钥
Nginx 配置 Https
进入到 conf.d 目录下
cd /usr/local/nginx/conf.d
#编辑配置文件tomcat.conf
vim tomcat.conf
完整文件如下:
注意修改 ssl_certificate 和 ssl_certificate_key 证书的路径和证书名字,127.0.0.1 改为你的域名
upstream blogs{
   ip_hash;
   server 127.0.0.1:8080 max_fails=3 fail_timeout=600s;
}
server {
        listen 80 backlog=65535;
        server_tokens off;
        server_name 127.0.0.1;
        #access_log /gs/nginx-logs/teach.access.log;
        #proxy_set_header Host $host:$server_port;
        proxy_set_header Host $host;
        # 获取真实IP
        proxy_set_header X-Real-IP $remote_addr;
        proxy_set_header REMOTE-HOST $remote_addr;
        # 获取代理者的真实ip
        proxy_set_header X-Forwarded-For   $proxy_add_x_forwarded_for;
        proxy_http_version 1.1;
        #proxy_set_header Connection "";
        proxy_buffering off;
        proxy_redirect off;
     location / {
        rewrite "/" https://127.0.01;
     }
 }

server {
        listen 443;
        #ssl on;
        server_tokens off;
        server_name 127.0.0.1;
        #access_log /gs/nginx-logs/teach.access.log;
        #proxy_set_header Host $host:$server_port;
        proxy_set_header Host $host;
        # 获取真实IP
        proxy_set_header X-Real-IP $remote_addr;
        proxy_set_header REMOTE-HOST $remote_addr;
        # 获取代理者的真实ip
        proxy_set_header X-Forwarded-For   $proxy_add_x_forwarded_for;
        proxy_http_version 1.1;
        #proxy_set_header Connection "";
        proxy_buffering off;
#        proxy_redirect off;
        ssl_certificate /usr/local/nginx/crt/a.pem;#证书文件名称
        ssl_certificate_key /usr/local/nginx/crt/a.key;#私钥文件名称
        ssl_session_timeout 5m;
        ssl_protocols TLSv1 TLSv1.1 TLSv1.2; #请按照这个协议配置
        ssl_ciphers ECDHE-RSA-AES128-GCM-SHA256:HIGH:!aNULL:!MD5:!RC4:!DHE;#请按照这个套件配置
        ssl_prefer_server_ciphers on;
     location / {
        proxy_pass http://blogs;
     }
     location /blogs {
          proxy_next_upstream http_502 http_504 error timeout invalid_header;
              set $origin '*';#写入需要跨域的请求地址
             if ($request_method = 'OPTIONS') {
                add_header 'Access-Control-Allow-Origin' $origin;
                add_header 'Access-Control-Allow-Methods' 'GET, POST, OPTIONS';
                add_header 'Access-Control-Max-Age' 17280000;
                #add_header 'Content-Type' 'multipart/form-data';
                #add_header 'Content-Type' 'text/plain charset=UTF-8';
                add_header 'Content-Length' 0;
                return 204;
                }
             if ($request_method = 'POST') {
                add_header 'Access-Control-Allow-Origin' $origin;
                #add_header 'Content-Type' 'multipart/form-data';
                add_header 'Access-Control-Allow-Methods' 'GET, POST, OPTIONS';
                add_header 'Access-Control-Allow-Headers' 'DNT,X-CustomHeader,Keep-Alive,User-Agent,X-Requested-With,If-Modified-Since,Cache-Control,Content-Type';
                }
             if ($request_method = 'GET') {
                add_header 'Access-Control-Allow-Origin' $origin;
                add_header 'Access-Control-Allow-Methods' 'GET, POST, OPTIONS';
                add_header 'Access-Control-Allow-Headers' 'DNT,X-CustomHeader,Keep-Alive,User-Agent,X-Requested-With,If-Modified-Since,Cache-Control,Content-Type';
                }
             proxy_pass http://blogs;
     }
}
配置完成后重启 Nnginx
#重启

/usr/local/nginx/sbin/nginx -s stop
/usr/local/nginx/sbin/nginx
#或者
service nginx restart
服务器需要关闭防火墙,云服务器需要在控制台开放 80,443 端口
欢迎来到这里!
我们正在构建一个小众社区,大家在这里相互信任,以平等 • 自由 • 奔放的价值观进行分享交流。最终,希望大家能够找到与自己志同道合的伙伴,共同成长。
注册 关于